Articles by "web"
Showing posts with label web. Show all posts
If you open Google Maps at any point of the day, you may notice something else. On April Fool's Day, Google has integrated the Pac-Man (Ms. Pac-Man) game into the Maps application, allowing users to enjoy the same classic game. On its directions app.


Google confirms this integrated game will last until April 4, and users can access it from their computer or through the Maps app on Android. However, there appear to be some differences between the two versions.
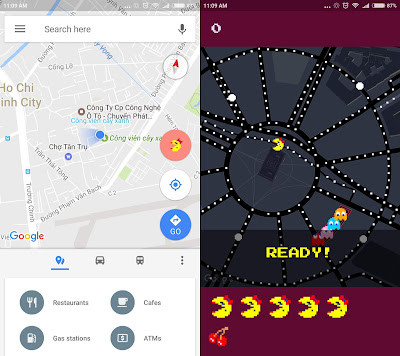
When visiting Ms. Pac-Man on Android app, you will be instantly transferred to any location on the world map and interact with the game at that location.


By contrast, the Maps version on your PC allows you to interact with the game at your current location.


You should also note that if you live in an area with very few roads, you will not be able to play this game because Ms.Pac-Man needs a certain road density to make maps for the game. In that case, Google will give you the option to play in random positions - the same way you do on Android apps.

Of course, this is not the first time Google has integrated Pac-Man into the Maps app. Two years ago, the search giant did the same thing on April Fool's Day. However, at that time, Google has integrated the original version of Pac-Man.

Pac-Man games on the map app are not the only thing Google offers on April Fool's Day. According to Android Headlines , Google will launch Google Gnome - a device similar to Google Home but designed to operate outdoors, today (01/04).
The largest social network in the world claims to be testing postscript content with GIF images from sites like Giphy or Tenor.


The TechCrunch site says that Facebook is testing the comment feature of the post with GIF images. The feature works similar to the GIF button on Messenger, allowing users to browse popular GIF images from Giphy, Tenor or find GIF images by keyword.
GIF animation proves to be one of the most visually appealing visuals of any video, especially if it's annoying with video and auto-play audio, GIFs are a fantastic replacement.

GIF image commenting is being tested by a number of users, and is expected to be released by Facebook in the near future.
No longer delivering real value and no mobile support is the main reason that YouTube will remove notes from the video in the near future.

According to Slashgear , Google has announced that it will officially remove the annotations feature on YouTube videos starting May 2. Annotated and currently published videos will still be viewable on a computer. After the above time, new videos uploaded to YouTube will not be able to insert annotations.
YouTube video captions are text boxes that appear at a certain point in time to better explain video content, or fix a misspelling. Users can disable these text boxes by pressing the X in the right corner.
YouTube annotations have long become an effective advertising tool. This is also one of the favorite features of many content creators on YouTube. However, the comment still has many shortcomings that gradually lose the advantage.Many YouTube users use annotations as a way to increase their click-throughs, advertising by putting a lot of comments on the video that is annoying and annoying to the viewer.
That's only partly because now YouTube videos are viewed on mobile devices even more on a computer. The lack of YouTube annotations for mobile devices makes retention of annotations seemingly unnecessary.

The disappearance of the annotation tool on YouTube videos promises to open up other alternative forms to be more effective. Features Cards and End Screen is one of the extremely useful alternative to be expected.

Caption feature in the form of Cards
Annotation feature in the form of End Screen

Two new annotation features are Cards and End Screen that fully support both the mobile platform and the computer.According to YouTube, the click-through rate of cards and end screens gives a 7x higher interactive volume than the previous callout.
If you have an older Router that supports Repeater functionality, you can use it to expand your home's Wi-Fi coverage.


You've just moved to a new home and one of the things you've invested in is the Internet. Similar to most other broadband connections, the network cables are usually connected to the wall. To ensure that you do not affect the look of your home, use wireless routers and place them right at the built-in audio outlets.
Everything is fine except that you use the Internet connection in the kitchen or balcony. Wi-Fi signals are hardly ever present in these places, and that is when you need to think about using an older router as a repeater.
The GuidingTech tutorial below will detail the steps you can take to turn an older router into a repeater for Wi-Fi.
Step 1: Get details of Wi-Fi from the main router
The first thing you need to do is to find out the details of your current Wi-Fi connection. You will need the SSID, ie the Wi-Fi network name, the password you use to connect, and finally the security type of the Wi-Fi network you are using.

The easiest way to get this information is to connect your computer to a Wi-Fi network and select Properties from the right-click menu.

The SSID is the name of the Wi-Fi network you are connecting to . The Security type and Network security key are located under the Security tab on the Wireless Network Properties window .
Save the settings by writing them down or save them in a Notepad file before proceeding to the next step.
In addition, you can also find the information on the router's administration page. However, access to the router is not necessary in this case.
Note : If you are using Connectify software or a virtual hotspot to broadcast Wi-Fi, the default security type will be WPA2.
Step 2: Reset the old router settings and make the connection
Once you have all the necessary details from the main router, power the old router and reset the factory settings to it.Most routers have a dedicated Reset button, or you may have to press and hold the WPS button for a few seconds.Restoring the original installation and starting the reset from scratch is the best way to accomplish this.
Once that's done, disconnect your computer from the main wireless network and connect it to the second router using an Ethernet or Wi-Fi cable.
To access the router's management page, you need to have its SSID, login name, and default password. This information may be printed on the device body or in the user's manual. You can also open the support page of the manufacturer to find them.

Now, you wait for the computer to receive the default IP and then connect to it via the default web browser on your computer. Most of the lines have default IPs of 192.168.0.1 or 192.168.1.1 but this IP may differ depending on the settings from the manufacturer. At the login page, enter admin in both the login name and password fields.

Step 3: Configure Router to Repeater
Once at the Router Management page, look for wireless network settings. At this setting page you will find an option called Operation Mode . Please select this setting and change it to Repeater . Next, click the Search / Survey button to find all the Wi-Fi networks around you.

Once you've done that, click the Connect button at your Wi-Fi network name, enter the password, and save the settings.
If the router does not ask for a password, open the wireless security page and manually enter the password.
The wireless security settings and passwords on the secondary router must match the settings on the main router, which is what you obtained in Step 1 . Finally, the router will ask you to restart the device. After booting, you will see that the second router is set to Repeater mode and has the same Wi-Fi name as the primary network.

Step 4: Select the router location
If your main router is being placed at the bottom of the house, do not place the second router near that location.Instead, place it somewhere in the middle of the house or in places where the Wi-Fi signal remains halfway up. This helps extend the Wi-Fi signal to the rest of the house, and that's where the main Wi-Fi routers of the main router are not.
Now you can enjoy a stable wireless Internet connection throughout your home. This way is especially useful for those who sit on the balcony to read the news or work and sip a cup of coffee and breathe fresh air every morning.
If you do not want email content automatically appears when you select it in Outlook, you can turn off the preview pane in the article under the guidance of HowToGeek under the wire.


By default, when you select an email in Outlook, the content of that email will automatically be opened in the preview pane (Reading Pane) on the right. Even if you do not click on any email, the contents of the first e-mail account will appear first on the Reading Pane.
Previously, the preview pane is hidden one of the important actions to help protect you from threats coming from the malicious code is inserted in the email. However, Outlook now been equipped with plenty of features to help you become more secure before the attachments (attachment) in the email.
"To protect you from malicious code, Outlook has disabled the content embedded in attachments, such as scripts (scripts), macros, ActiveX controls, while you preview email content " .
However, you should still be careful when opening emails and attachments - just open the attachments and emails from identified sources.
If the preview has to take measures to protect you against threats from malicious attachments, why do you need to turn off the preview pane?
If you often work in public places, at home or at work. Meanwhile, friends, colleagues, relatives and even people you do not know may be curious peek while you are reading your email. Disabling the preview pane will at least help you to hide the contents of emails from such prying eyes.
In this article, How-To Geek will show you how to hide the preview pane in Outlook for Windows and Mac.
Reading Pane in Outlook hiding for Windows

To hide the preview pane of Outlook for Windows, you select the View .

Next, you press the Reading Pane and select Off from the drop-down menu. This menu also allows you to scroll down below the preview pane (bottom) of the Outlook window.

Preview pane turned off. Now, to read emails you need to double-click it in the list. Email will open in a separate window.


If you want to reopen the Reading Pane, select Right or Bottom from the drop-down menu Reading Pane in Card View.

Reading Pane in Outlook hiding for Mac
Reading Pane in Outlook for offline for Mac, you select the Organize .

Next, you press the Reading Pane and select Off from the drop-down menu. Here, you can also scroll down to the bottom preview pane (bottom) of the Outlook window.

Reading Pane has been closed. Now, to read emails you need to double-click it in the list. Email will be open on a separate window.


To turn the preview pane, you simply select Right or Bottom from the drop-down menu Reading Pane on the cardOrganize .